Send to controller
Once a mission is planned and saved, this is the last mile: turn it into a DJI Fly KMZ and get it onto your controller so you can fly it. Downlink does the fiddly bits — the 200-waypoint split and the file naming — so you're mostly just copying files.
Where to find it #
Sidebar → Transfer
Two things live in two places, so it's worth being clear up front. You export the KMZ from the mission's own page (the Export card). The Transfer page is the step-by-step guide for getting that file onto the DJI RC 2 — plus a one-time trick to make exports match your exact controller. This page covers both.
Export the KMZ #
- Open the saved mission — from the planner, your recent missions on the dashboard, or the linked job. If you changed any parameters, hit Regenerate first — the download button stays disabled while a mission is stale.
- Hit Download KMZ — the button reads
⬇ Download KMZ, and shows(2 parts),(3 parts)… when the grid is large enough to split. On the native Mac app this opens a save dialog so you choose exactly where it lands (a working folder, or a mounted SD card). In a browser it drops into Downloads; on iPhone it's saved to Files. - Collect every part — a single-part mission saves as
your-mission.kmz. A split mission saves asyour-mission-p1.kmz,your-mission-p2.kmz, and so on. Copy all of them across — each part is one flyable mission.
DJI Fly caps a waypoint mission at 200 points. Downlink splits large grids conservatively at 190, and only ever breaks at a flight-line boundary — never mid-pass — so every line stays whole inside one file. You just fly the parts in order from the same takeoff point. (If a single line on its own needs more than 190 waypoints, the export will stop and ask you to raise altitude or trim the area — a line can't be split across files.)
Get it onto the RC 2 #
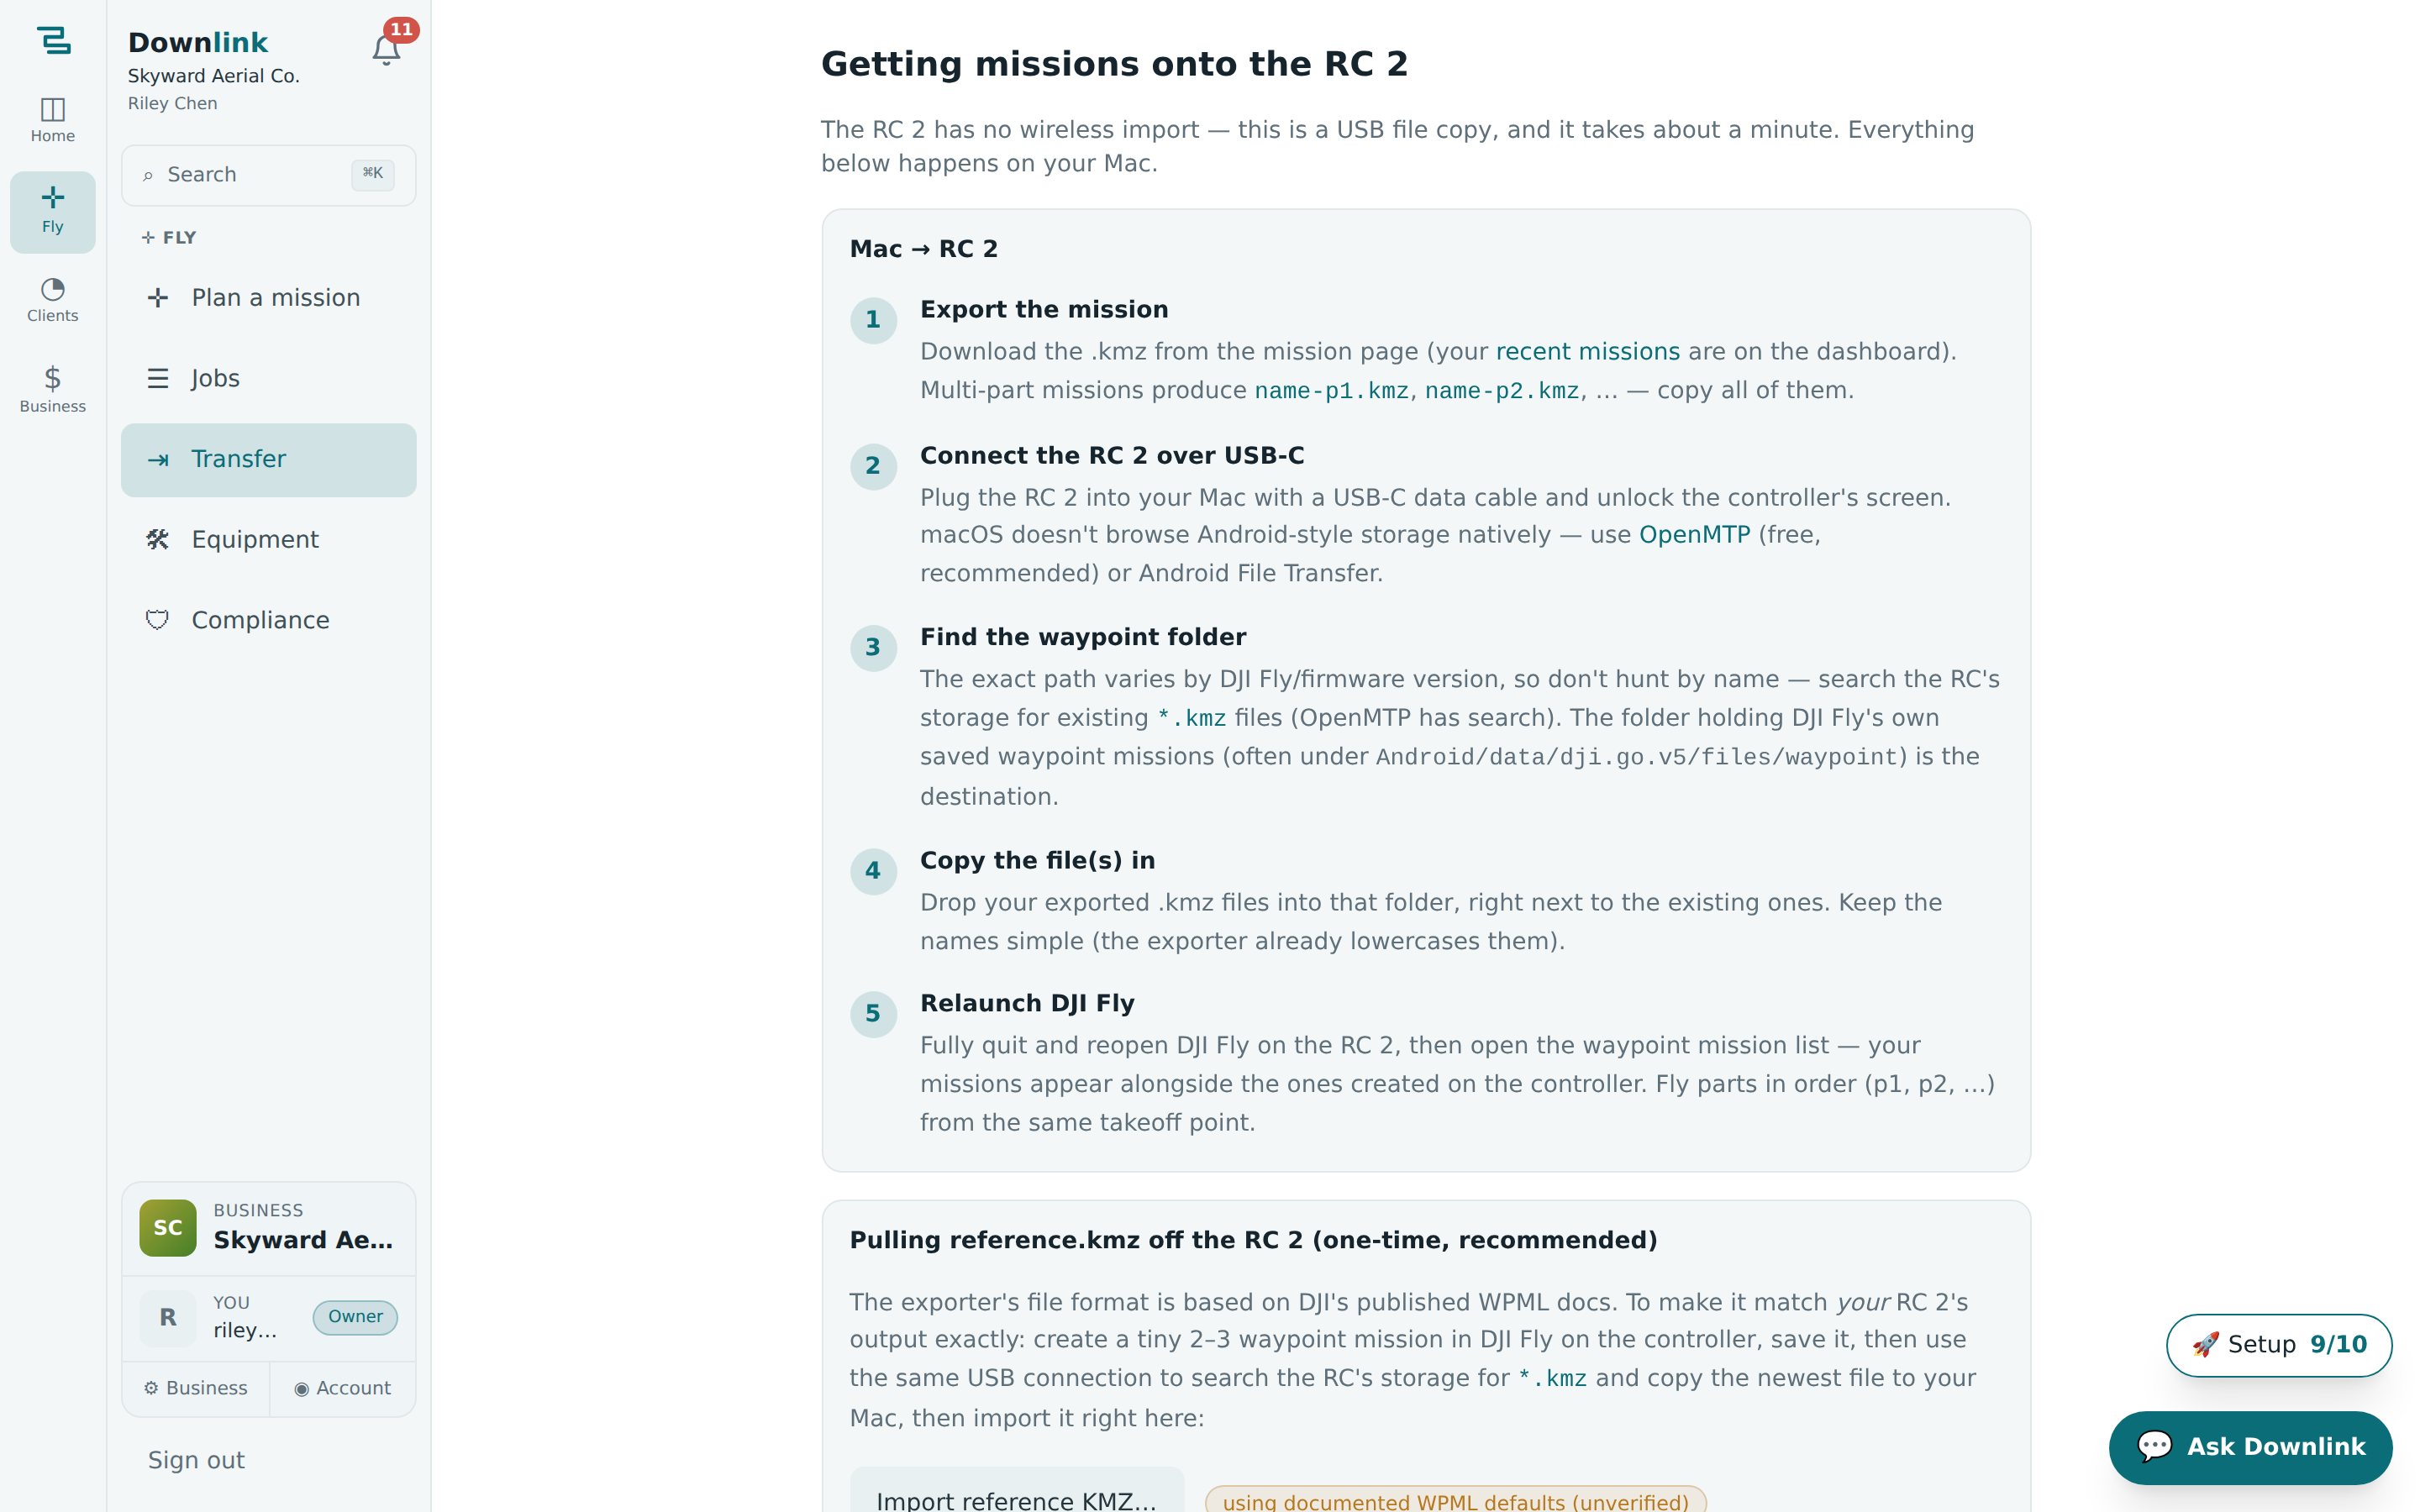
The DJI RC 2 has no wireless import, so this is a quick USB file copy — about a minute, all done on your Mac.
- Connect over USB-C — plug the RC 2 into your Mac with a data cable and unlock the controller's screen. macOS can't browse Android-style storage on its own, so use OpenMTP (free, recommended) or Android File Transfer.
- Find the waypoint folder — don't hunt by name; the exact path shifts with DJI Fly versions. Instead search the RC's storage for existing
*.kmzfiles. The folder holding DJI Fly's own saved missions (oftenAndroid/data/dji.go.v5/files/waypoint) is your destination. - Copy the file(s) in — drop your exported KMZ files right next to the existing ones. The names are already lowercased and tidy, so leave them as they are.
- Relaunch DJI Fly — fully quit and reopen it on the RC 2, then open the waypoint mission list. Your missions appear alongside any made on the controller.
- Fly the parts in order — for a split mission, fly p1, then p2, and so on, all from the same takeoff point.
Skyward Aerial Co. (owner Riley Chen) maps a big earthworks site for Northgate Construction (Sam Ruiz). The grid is large, so it splits into two parts.
| Field | Example value | Why/Notes |
|---|---|---|
| Mission name | Northgate — Phase 2 earthworks map | Set on the planner; drives the exported file names. |
| Total waypoints | 342 | Over the 190 threshold, so Downlink splits it. |
| Auto-split | 2 parts, at line boundaries | Never mid-pass — each flight line stays intact. |
| Files produced | northgate-phase-2-earthworks-map-p1.kmz + …-p2.kmz | Copy both; each is one flyable mission. |
| Save location (Mac) | native save dialog → job SD-card folder | The Mac app lets you pick the exact destination. |
| Transfer tool | OpenMTP over USB-C | macOS can't browse the RC's storage without it. |
| RC destination | Android/data/dji.go.v5/files/waypoint | Drop next to DJI Fly's own saved missions. |
| Fly order | p1 → p2, same takeoff point | Relaunch DJI Fly first so both parts show up. |
Downlink's KMZ follows DJI's published WPML format, which flies fine — but you can make it mirror your RC 2 precisely. Create a tiny 2–3 waypoint mission in DJI Fly, save it, copy that newest .kmz back to your Mac, then hit Import reference KMZ… on this page. The badge flips from using documented WPML defaults to Reference format active, and every future export matches your controller's own drone/payload, height mode, and camera actions. Reset to documented defaults undoes it anytime.
Exports on the iPhone app save to Files → On My iPhone → Downlink. AirDrop them to your Mac (or share via iCloud Drive) and follow the RC 2 steps above — there's no direct iPhone-to-controller transfer.
The Export card also offers GeoJSON and CSV of the numbered waypoints for debugging, plus a Boundary KML (Pro) you can drop straight into DroneDeploy. Planning the mission itself lives back in the mission planner.